A distributed OpenStack installation with 100 Nova compute nodes
This blog will cover my experience with scaling Red Hat Enterprise Linux OpenStack Platform to 100 compute nodes behind a single controller and dedicated neutron networking node on the Ravello Cloud.
www.ravellosystems.com
Preface
Scope of Case Study
-
Configuration of the inital setup and installation in Ravello
-
VM Configuration - Virtual Hardware/Networking
-
Operating System and Installation Methods
-
-
-
Modifying Nova Compute node image to auto connect to the controller on initialization
-
Using Ravello API to add Compute Nodes to existing Controller (scaling to 100 Compute Nodes)
-
Limitation found while implementing this case study
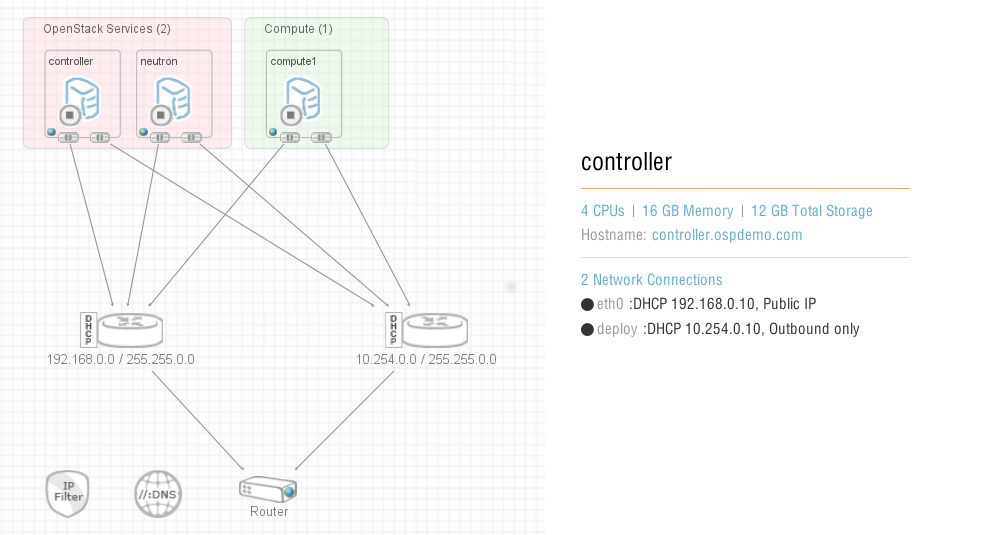
I started out with a total of 3 Nodes. The Controller and Neutron node both with 4 CPUs and 16GB of memory - may be overkill. My thought here was as we scale the environment to multiple compute nodes the mariadb and messaging broker running on the controller node will be very active. To mitigate any cpu/memory resource issues I used 2 large VMs.
| Hostname | CPU | MEM | DISK | NICS | Description |
|---|---|---|---|---|---|
controller |
4 |
16GB |
12GB |
2 |
OSP Controller |
neutron |
4 |
16GB |
12GB |
2 |
OSP Networking |
compute1 |
4 |
4GB |
24GB |
2 |
OSP Compute |
The main purpose of this test was to see how compute nodes would scale under a single controller with dedicated neutron networking. So I scaled back the compute node to 4 GB of ram to be cost efficient.
In practice I would of course give the compute nodes as much processing and memory are possible. For this test we are fine with 4GB.
| Network | NIC/OVS-BRIDGE | IP ADDRESS | Description |
|---|---|---|---|
MGMT/EXTERNAL |
eth0/br-ex |
192.168.0.0/16 |
Management Network |
OSP/PRIVATE |
eth1/br-int |
10.254.0.0/16 |
OpenStack Private Network |
1. Operating System and OpenStack (versions)
| Operating System | Red hat Enterprise Linux 7 |
|---|---|
OpenStack Version |
Red hat Enterprise Linux OpenStack Platfor |
This installation was deployed on Red hat Enterprise Linux 7 (64bit) using the packstack installer. I chose packstack as the installer so that I can share the configuration easily with anyone that may want to attempt a similar installation. For reference you can find a copy of the packstack answerfile here. Download Here
1.1. Operating System installation Steps:
1.1.1. Install 3 Red hat Enterprise Linux 7 Servers
During the install options choose minimum
1.1.2. Register the system via Red Hat Subscription Management
subscription-manager register
subscription-manager subscribe --auto
subscription-manageSubscriber list --consumed
1.1.3. Subscribe to Red Hat Enterprise Linux Openstack Platform repositories
subscription-manager repos --disable=*
subscription-manager repos --enable=rhel-7-server-rpms
subscription-manager repos --enable=rhel-7-server-optional-rpms
subscription-manager repos --enable=rhel-7-server-OpenStack-5.0-rpms
|
|
For more info on subscription management go to https://access.redhat.com/documentation/en-US/Red_Hat_Subscription_Management/1/html/RHSM/sub-cli.html |
1.1.4. Install the necessary yum packages
Adjust the repository priority, and update OS
yum install -y yum-plugin-priorities yum-utils
yum-config-manager --setopt=”rhel-7-server-OpenStack-5.0-rpms.priority=1” --enable rhel-7-server-OpenStack-5.0-rpms
yum update -y
1.1.5. Disable NetworkManager then reboot
systemctl disable NetworkManager
1.1.6. Install and run the PackStack installer and OS Utils
yum install -y OpenStack-packstack git wget screen curl
1.1.7. Reboot the system to load the latest kernel
reboot
|
|
This would a good time to save the OS image into the VM Library. You can clone this image to create the other two servers or repeat install procedure (See Appendix A-1 for more info) |
2. Working with packstack
|
|
You can also generate a generic answerfile by doing the following: I have provided a link to the answerfile I used |
packstack --gen-answer-file answers.txt #OPTIONAL
2.1. Grab the packstack answer file
git clone https://github.com/avattathil/redhat_osp5_base.packstack
Expected Output
git clone https://github.com/avattathil/redhat_osp5_base.packstack
Cloning into 'redhat_osp5_base.packstack'...
remote: Counting objects: 12, done.
remote: Compressing objects: 100% (9/9), done.
remote: Total 12 (delta 1), reused 6 (delta 0)
Unpacking objects: 100% (12/12), done
|
|
answerfile will be in a folder called redhat_osp5_base.packstack (cd redhat_osp5_base.packstack) |
2.2. Inspect the answer-file
vi the answer-file take note of the following setting (edit the interface if needed)
CONFIG_NOVA_NETWORK_PUBIF=eth0
CONFIG_NOVA_NETWORK_PRIVIF=eth1
CONFIG_NOVA_NETWORK_VLAN_START=100
CONFIG_NOVA_NETWORK_NUMBER=1
CONFIG_NOVA_NETWORK_SIZE=255
CONFIG_NEUTRON_ML2_TENANT_NETWORK_TYPES=vxlan
CONFIG_NEUTRON_ML2_FLAT_NETWORKS=*
CONFIG_NEUTRON_OVS_BRIDGE_MAPPINGS=physnet1:br-ex
|
|
For this install we will implement vxlan for our Neutron tenant networking
|
2.2.1. Update IPADDRESS
CONFIG_DEFAULT_PASSWORD=<somepassword>
CONFIG_CONTROLLER_HOST=192.168.0.10
CONFIG_COMPUTE_HOSTS=192.168.100.1 (as we add compute nodes we will increment the ip by 1 through ravello dhcp)
CONFIG_NETWORK_HOSTS=192.168.0.20
CONFIG_STORAGE_HOST=192.168.0.10
CONFIG_AMQP_HOST=192.168.0.10
CONFIG_MARIADB_HOST=192.168.0.10
CONFIG_MONGODB_HOST=192.168.0.10
|
|
You will be asked to provide the root password to COMPUTE and NETWORK hosts |
2.2.2. After the installation
After installation completes on the controller verify that in /etc/OpenStack-dashboard/local_settings
Allowed host line should look like this → ALLOWED_HOSTS = ['*']
If it’s different than what is shown above update it and restart the web-server and OpenStack services
service httpd restart
OpenStack-service restart
3. OpenStack CLI
Lets use the OpenStack cli to create flavors,load some cloud images add a cloud-key create a neutron networks and then modify the default security-group
3.1. Source your OpenStack credentials on the Controller
source /root/keystone_admin.rc
3.1.1. Glance (Add fedora 21 cloud image)
glance image-create --name 'Fedora 21 x86_64' --disk-format qcow2 --container-format bare --is-public true --copy-from http://download.fedoraproject.org/pub/fedora/linux/releases/21/Cloud/Images/x86_64/Fedora-Cloud-Base-20141203-21.x86_64.qcow2
3.1.2. Nova (Create a flavor and a nova keypair)
nova flavor-create ravello.flavor 1 1024 2 1
nova keypair-add fedora > /root/fedora.pem
chmod 0600 /root/fedora.pem
3.1.3. Neutron (Create an floating ip network)
neutron net-create external --shared --router:external=True
neutron subnet-create external --name ext-subnet --disable-dhcp --allocation-pool start=192.168.150.1,end=192.168.155.250 --gateway 192.168.0.2 192.168.0.0/16 --dns-nameservers list=true 8.8.8.8 8.8.4.4
neutron net-create intranet --shared
neutron subnet-create intranet --name intranet-subnet  9.0.0.0/24  --dns-nameservers list=true 8.8.8.8
neutron router-create router
neutron router-interface-add router intranet-subnet
neutron router-gateway-set router external
3.1.4. Neutron (Modify default security group)
neutron security-group-rule-create --protocol icmp --direction ingress default
neutron security-group-rule-create --protocol tcp --port-range-min 22 --port-range-max 22 default
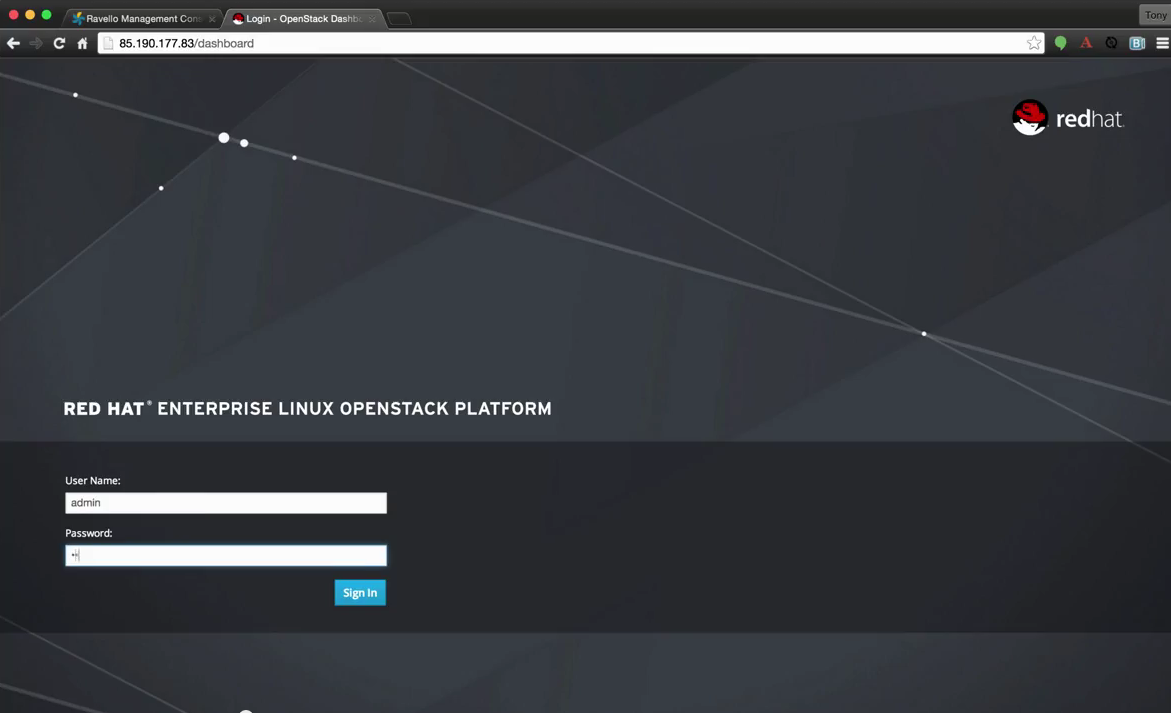
4. OpenStack Horizon Dashboard
You can now log into the OpenStack dashboard and inspect your installation. Open a web-browser to the external address of the controller node.
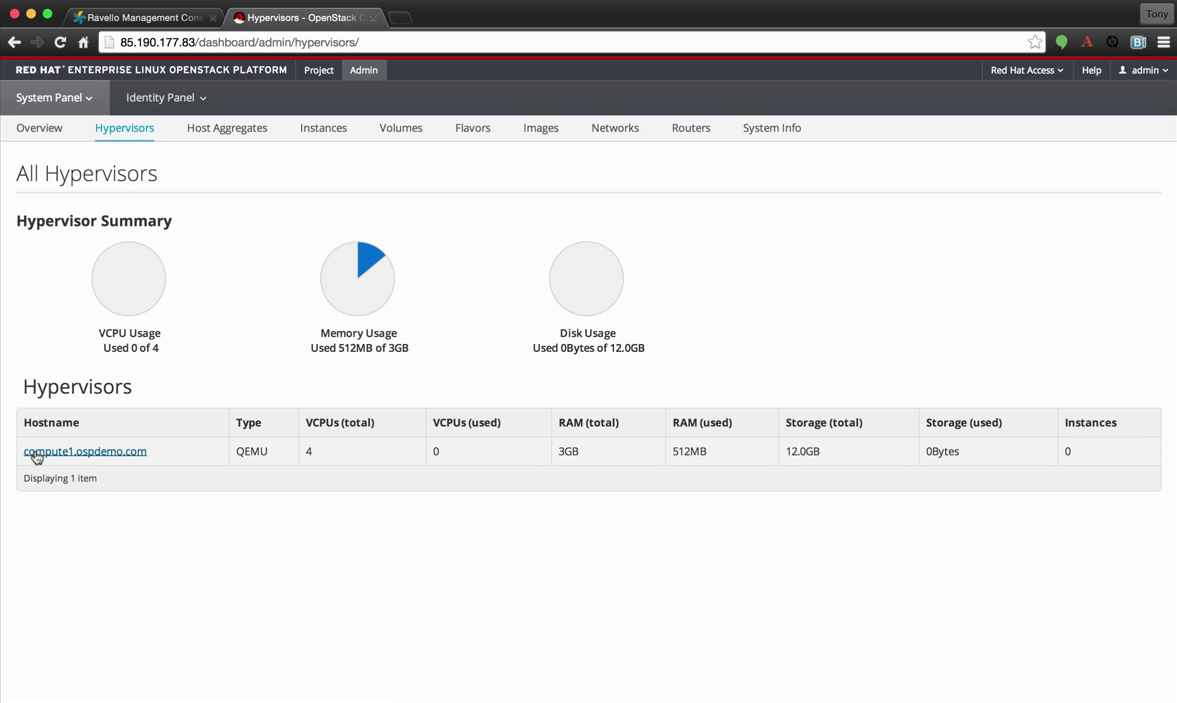
4.1. Navigate to the Hypervisor Tab
4.2. Create test instances
We can now create a couple of test instances on our 3 node OpenStack install
Go To to the instances tab → Click launch Instance
image::http://people.redhat.com/tonyv/pages/100/images/fig4.png[Launch Instance]
Assign the kepair called fedora
Choose intranet as the network
Then click Launch
4.3. Assign a floating ip for instance access.
|
|
In this installation the floating-ip network is routed over the mgmt subset of the 192.168.0.0/16
|
Click on the Associate floating ip button → Then choose/allocate an ip.
4.4. Connecting to the instance
4.4.1. Use the cloud key to connect to the instance
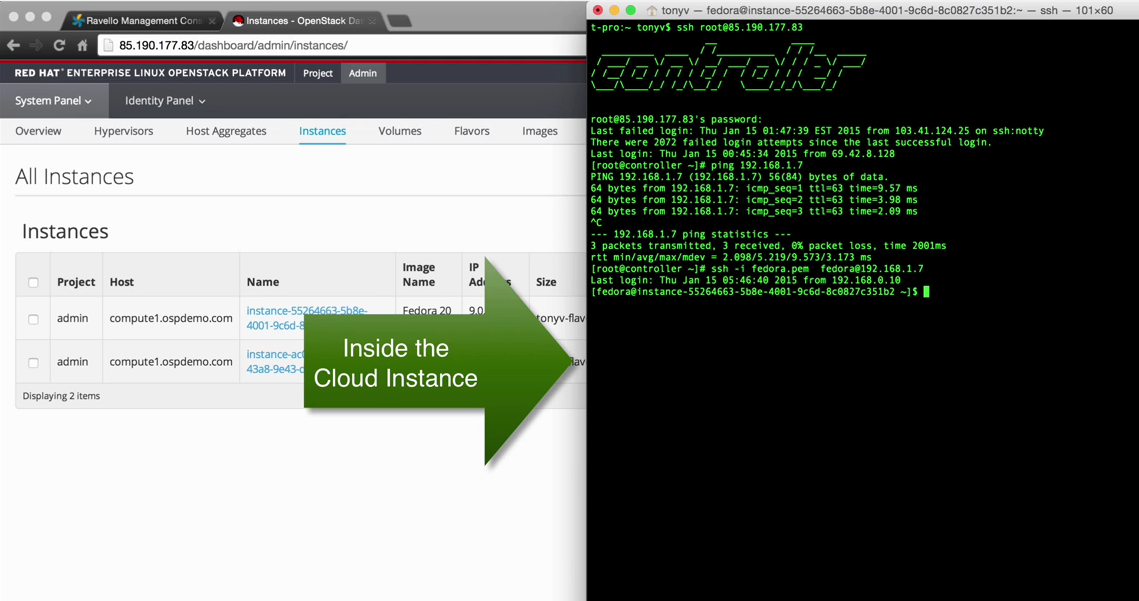
ssh fedora@<instance-floating-ip> -i /root/fedora.pem
4.4.2. Ping the second instance from the first instance
5. Install Ravello API on the Controller
We will use the ravello api to add compute images to the Ravello application. To do this we need to install the api on the controller
Get more details on Openstack SmartLab on AWS and APIs at http://www.ravellosystems.com/solutions/openstack/cloud-openstack-lab
5.1. Log into the controller
Install the ravello sdk. Follow the instructions here. https://github.com/ravello/python-sdk
6. Prepare Compute nodes
We need to make some modifications to the compute node. On boot the compute node will get a new address via the ravello dhcp server. We need to update the newly assigned address in some specific areas on the compute node so the nova compute service and ovs tunnels are formed correctly.
6.1. Autoconfigure VNC proxy and OVS tunneling interface
-
To get the
vnc consolefor openstack cloud instances the nova compute node needs to know where to redirect the console. More specifically thenovaproxy/proxyclientaddresses need to be updated in the nova.conf -
We need to update the interface ip address (br-int) that OpenVswitch will use on the compute node
To update these items on bootup I added the following to the /etc/rc.local file of the compute node
6.1.1. Update rc.local
-
Login into the compute node
-
vi the
/etc/rc.localand add the following command to the file
# The following script gets the external ip address  of the controller
EXT_OSPCTRL=`ssh -o StrictHostKeyChecking=no -q controller.ospdemo.com curl -s http://icanhazip.com `
# Next we need to set the local_ip addres used for the OVS tunnels
export LOCAL_IP=`ip addr show eth1 |grep "inet "|awk '{print $2}'|awk -F/ '{print $1}'`
#Update the nova configuration
openstack-config --set /etc/nova/nova.conf DEFAULT novncproxy_base_url http://${EXT_OSPCTRL}:6080/vnc_auto.html
openstack-config --set /etc/nova/nova.conf DEFAULT  vncserver_proxyclient_address ${LOCAL_IP}
openstack-config --set /etc/neutron/plugins/openvswitch/ovs_neutron_plugin.ini ovs local_ip ${LOCAL_IP}
|
|
Make sure that the compute node is up and running before you start the compute node. To get the external ip of the controller it must be started and have a public ip address assigned in the ravello via UI |
Now we can clone this compute node and it will automatically add itself to our controller
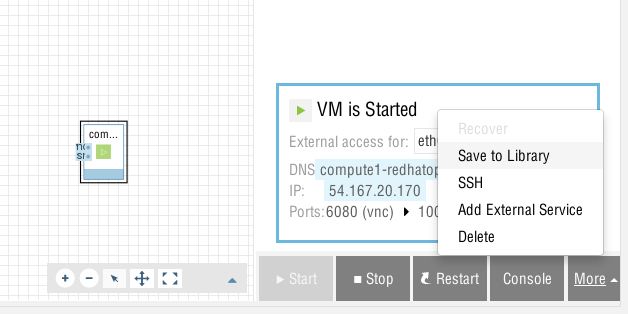
Create a ravello image of the modified compute node
To do this click on your compute node image → Then Click More → Save to Library
7. Add Compute nodes via Ravello API
7.1. Clone the node add script
git clone https://github.com/avattathil/compute_node_add.git
|
|
Test and make sure that the Ravello API is installed correctly more info here: https://github.com/ravello/python-sdk |
To use the new_node.py script you need provide your ravello account credentials
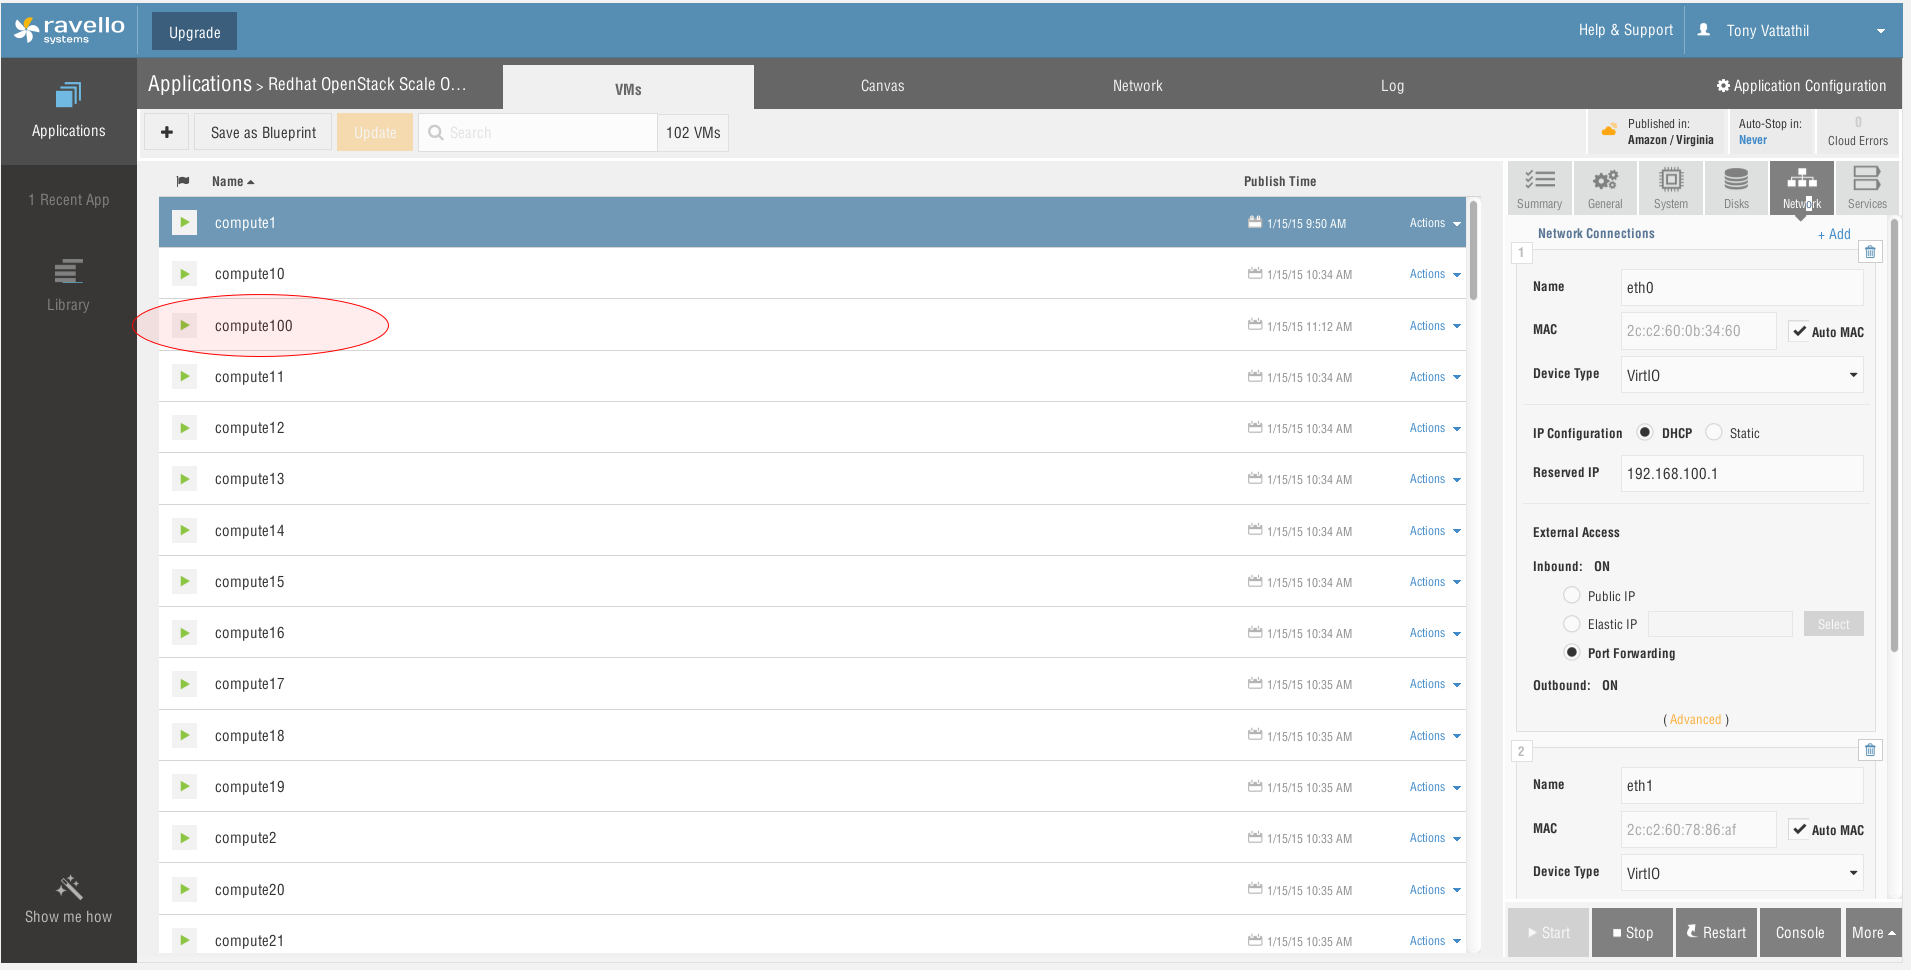
7.2. Obtaining your img_id and app_id
7.2.1. Get your compute node app_id
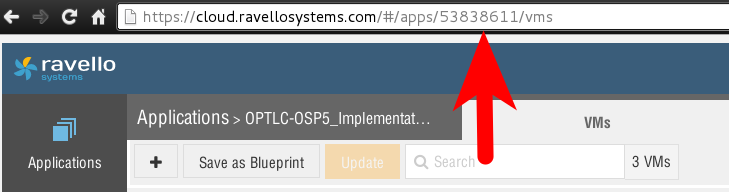
Loginto the Ravello interface → Open your application
7.2.2. Get your compute node img_id
The red arrow is pointed to the image id

|
|
Be sure to update your id in the script below |
cat > /root/ravello_auth.rc <<EOF
export RAVELLO_USERNAME=tonyv@redhat.com
export RAVELLO_PASSWORD=replacewithyoupassword
export RAVELLO_APPID=53838611
export RAVELLO_IMGID=53877196
PS1="\h(ravello_authenticated):\w# "
EOF

source /root/ravello_auth.rc
Your prompt should change to:
controller(ravello_authenticated):~#
7.3. Verify Ravello credentials
set |grep RAVELLO
RAVELLO_APPID=53838611
RAVELLO_IMGID=53877196
RAVELLO_PASSWORD=password
RAVELLO_USERNAME=tonyv@redhat.com
7.4. Add Compute Nodes via (Ravello API)
python new_node.py
CREATE NEW NODE 2
username is tonyv@redhat.com
app_id is [53838611]
img_id is [53877196 ]
Found Application: Red hat OpenStack Scale Out Demo
[Success]
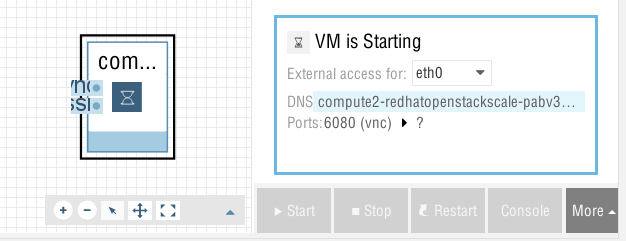
7.5. Verify that compute node is added
Now log back into the UI and you will see the compute node starting
8. Video Demonstration
Here is a video that demonstrates this procedure:
Please note the video was taken with previous Ravello UI. (the above screen-shots have been updated to the new UI)
The steps in the procedure remain the same.
9. Scaling to 100 Compute Nodes
Using the above mentioned procedure we can now use a simple shell for-loop and add 97 more nodes to a total of 100 compute nodes
for i in `seq 3 100` ; do python new_node.py; done
CREATE NEW NODE 3
username is tonyv@redhat.com
app_id is [53838611]
img_id is [53877196 ]
Found Application: Red hat OpenStack Scale Out Demo
[Success]
CREATE NEW NODE 4
username is tonyv@redhat.com
app_id is [53838611]
img_id is [53877196 ]
Found Application: Red hat OpenStack Scale Out Demo
[Success]
CREATE NEW NODE 5
username is tonyv@redhat.com
app_id is [53838611]
img_id is [53877196 ]
Found Application: Red hat OpenStack Scale Out Demo
[Success]

Output truncated ......
|
|
GRAB SOME LUNCH it will be a couple of hours to add the rest of the compute nodes |
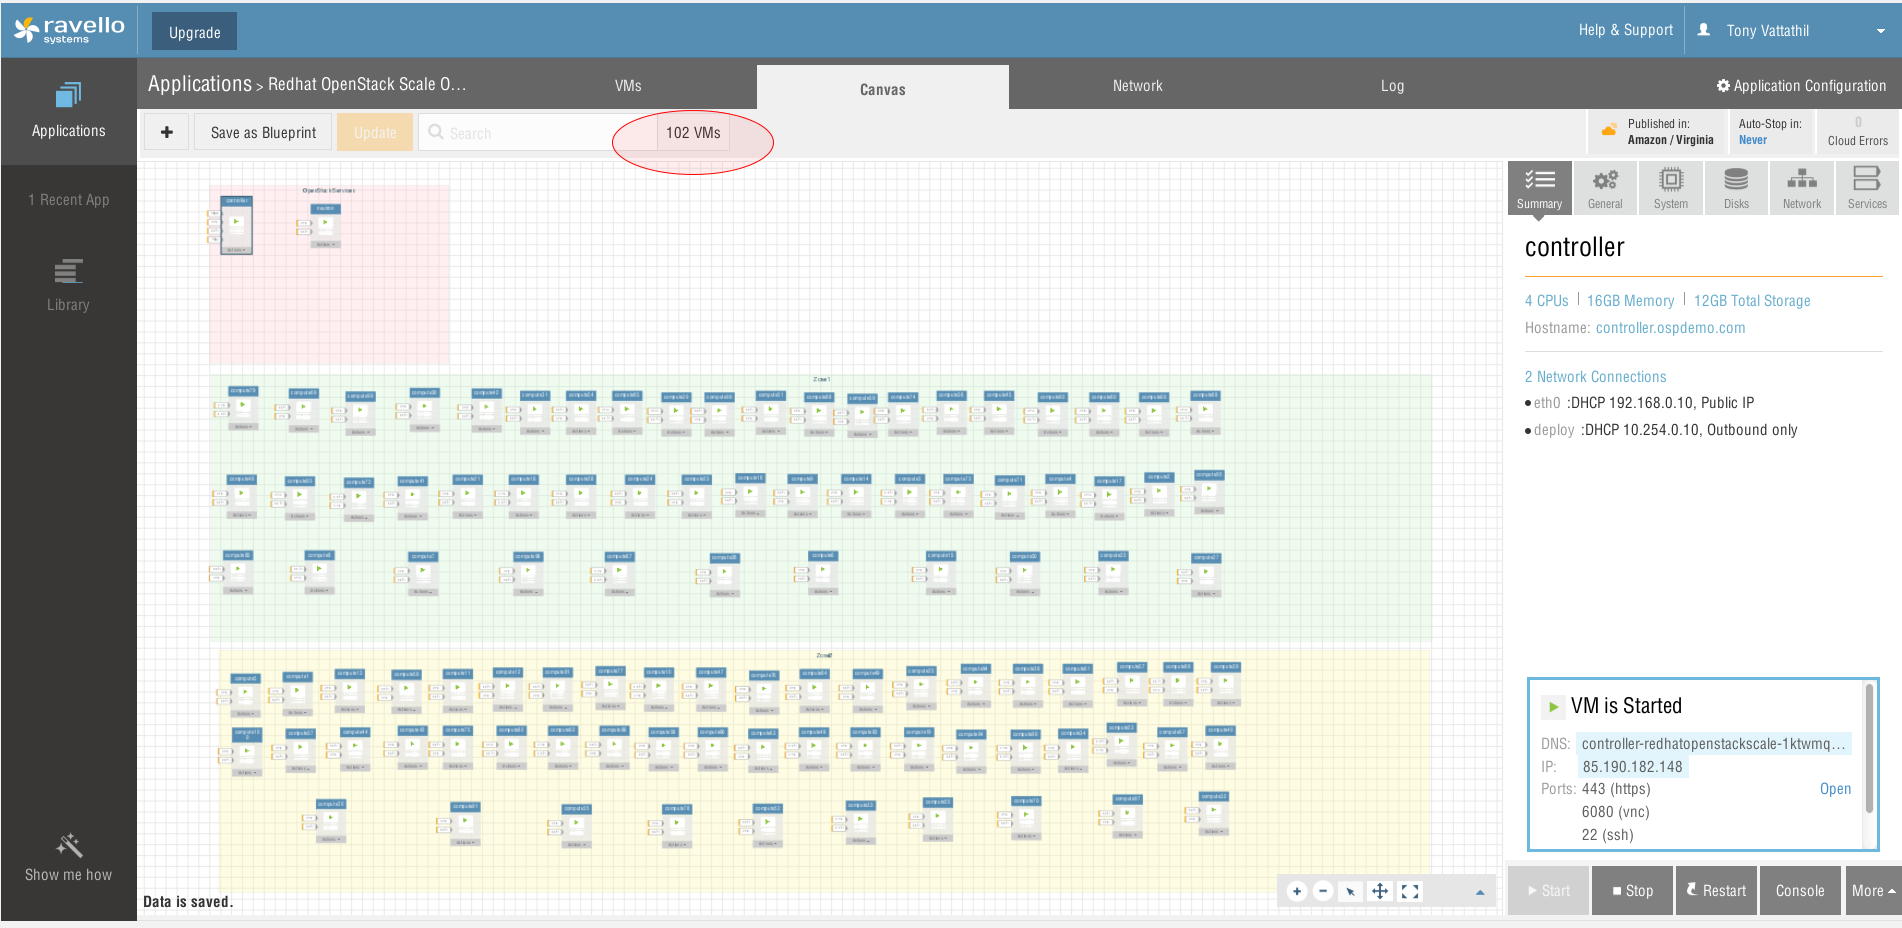
When you get back you will have the processing power of a 100 compute nodes.
Here are some screen shots of my install
Screenshot 1: OpenStack UI Show 1 Terabyte of Memory 400 VCPUS (I fired up ~80 instances)
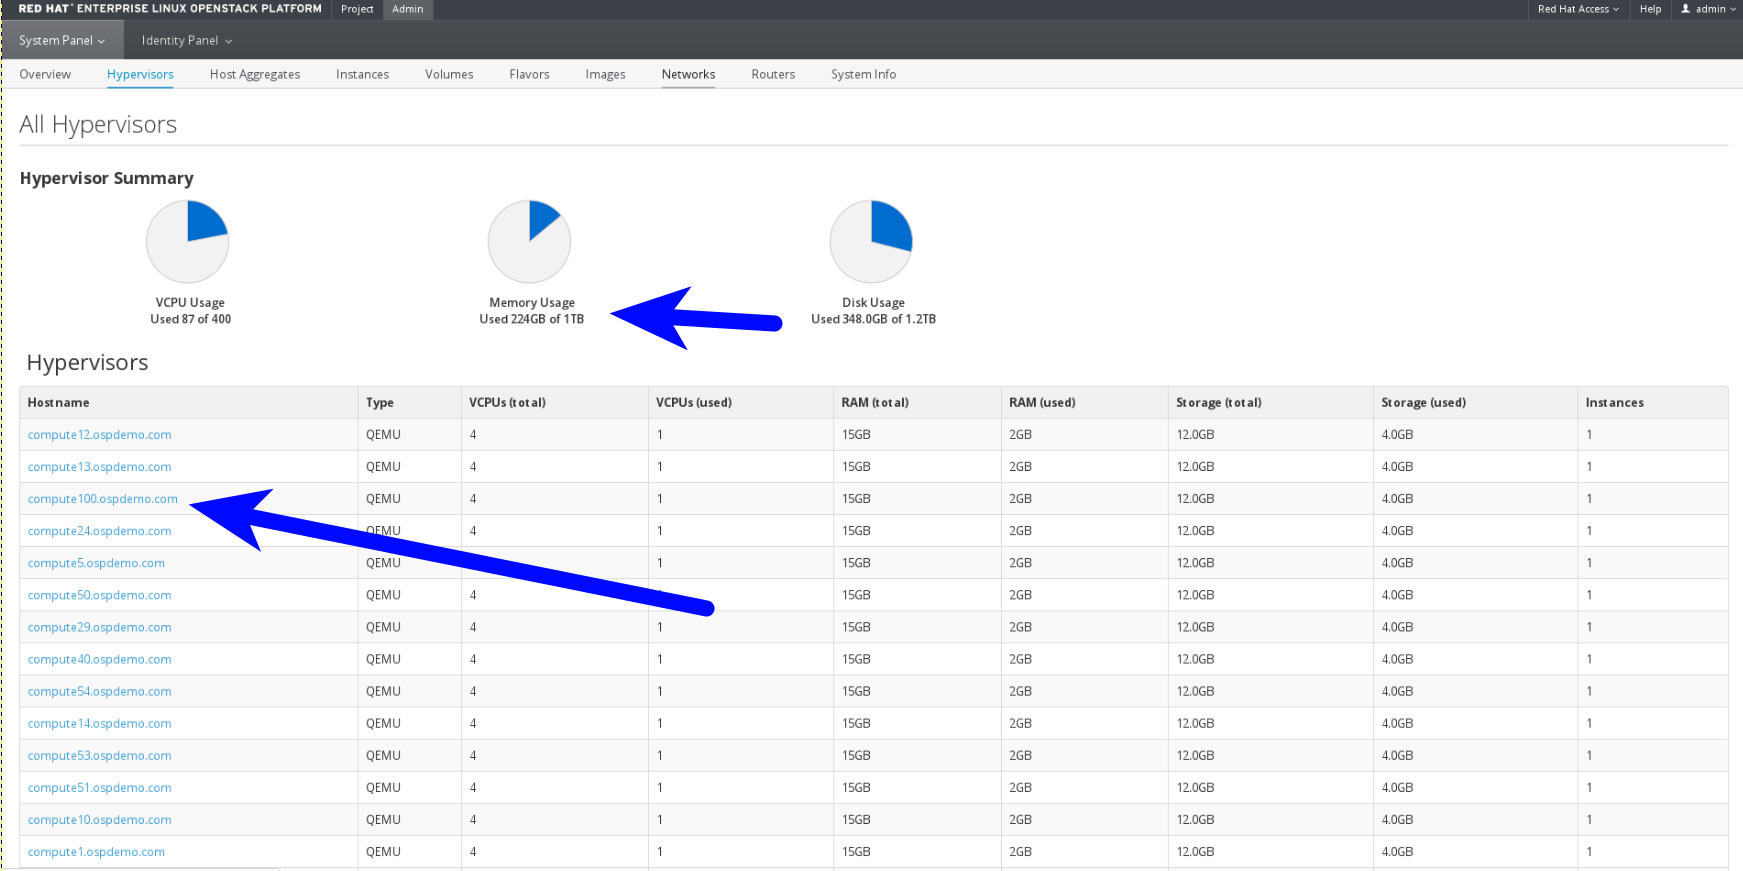
Screenshot 2: 100th compute node
Screenshot 3: Application view with all 100 compute nodes (total vm 102)
Appendix A
10. Saving a Ravello image into the VM Library (A-1)
In this example we will take our compute node image and Save it to the VM Library
To do this click on your compute node image → Then Click More → Save to Library
11. Limits Encountered (A-2)
11.1. Possible Rabbit MQ limit?
(I am not a MQ expert)
Above 100 Compute node in a single application.
With my testing I had degraded performance at around 110 compute node. I noticed that I was getting wait conditions in rabbit_mq. Its possible that with tuning the limitation can be overcome. I rolled back to 100 nodes to give some room from the edge.
[root@controller compute_node_add(keystone_admin)]# netstat  -ant |grep SY
tcp        0      0 192.168.0.10:5672       192.168.100.115:54971   SYN_RECV
tcp        0      0 192.168.0.10:5672       192.168.100.114:57320   SYN_RECV
tcp        0      0 192.168.0.10:5672       192.168.100.122:47224   SYN_RECV
tcp        0      0 192.168.0.10:5672       192.168.100.124:53438   SYN_RECV
tcp        0      0 192.168.0.10:5672       192.168.100.119:53632   SYN_RECV
tcp        0      0 192.168.0.10:5672       192.168.100.104:33543   SYN_RECV
tcp        0      0 192.168.0.10:5672       192.168.100.106:55940   SYN_RECV
tcp        0      0 192.168.0.10:5672       192.168.100.107:46320   SYN_RECV
tcp        0      0 192.168.0.10:5672       192.168.100.121:51945   SYN_RECV
tcp        0      0 192.168.0.10:5672       192.168.100.124:53436   SYN_RECV
11.2. Public IPs in application (recommendation)
Since the compute nodes do not need direct connection from the Internet avoid assigning public IP to the compute node. This keeps costs down and allows the overall application performance to be more favorable.
author: Tony Vattathil
email: tonyv@redhat.com